Decoding Guide for Outlook Express Users Decoding Guide for Outlook Express Users
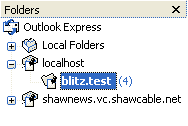
1. Startup Outlook Express, and open the newsgroup you want to download from. We chose blitz.test here, but
you'll probably want something like alt.binaries.something.
2. Click the Subject header (at the top of the newsgroup message list) to sort the messages by subject, then
find a file you want to download. Click on the subject of the first message entry for that file. In the example below,
we wanted to download NovusNews.
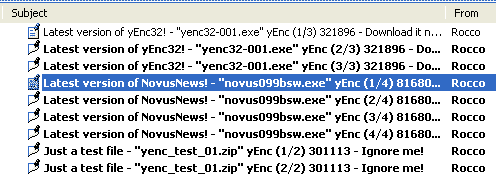
3. Scroll down to the last message entry for the file you want. Hold down the Shift key, then click the last
message entry.
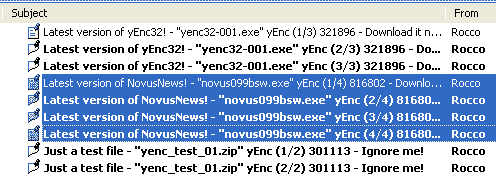
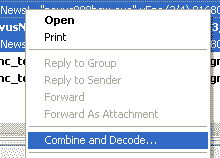
4. Place the mouse anywhere in the highlighted area, then click the right mouse button. A menu will appear; select
Combine and Decode from the menu.
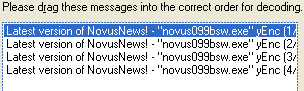
5. A dialog box will appear, asking you to put the files in the correct order. Do so if necessary, otherwise just click OK.
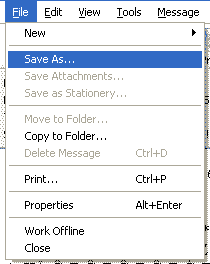
6. A new window will appear. It will probably be full of what appears to be garbage or "greek" letters; just ignore that. Click the
File menu, then click Save As....
7. Choose a folder you'll remember (My Documents or Desktop is fine). For "Save as type:", select Text Files (*.txt).
For "File name:", enter a filename that you'll remember (you'll need again it in a minute or two). Then click Save.

8. Now, startup yEnc32. Click the Decode button.

9. Browse to the folder you chose in step 7. For "Files of type:", choose All Files (*.*). Then, choose the filename
you entered in step 7. Then click Open.

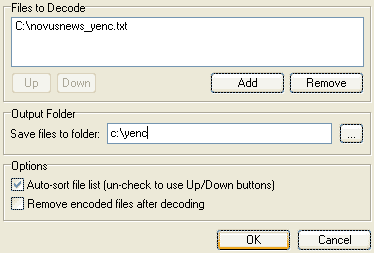
10. A new window will appear; the only thing you might need to change is "Save files to folder:", if you want to pick
a new folder for your decoded files. If so, click the ... button to browse for a new folder. Then click OK.
11. You're done! If all goes well, you'll see something like this:
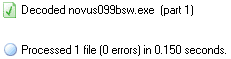
Your decoded files can now be found in the folder you chose in step 10.
Return to yEnc32.com
|